Accessing a DRM Framebuffer to display an image
When doing bring-ups on embedded devices a useful way to test if a display interface is working is this command:
Apalis iMX6 $ dd if=/dev/urandom of=/dev/fb0This shows random data on the display and a lot of gray, red, blue, and green dots appear. This doesn't tell us if everything is working as expected because maybe the resolution is wrong or some timings are too tight but it gives already an indication if the display controller works and if the display gets some understandable data.
However, this example only works for framebuffer device drivers under Linux. For the iMX6 this means that the above method only works for the proprietary driver but not for the upstream-based driver. Modern Linux graphics drivers like the iMX6 upstream driver provide a DRM interface to the user space and therefore don't provide a framebuffer device. We can't just simply dump data to a character device to show it on a display. Instead, we need to set up a whole pipeline that tells what framebuffer should be used as input to the CRTC.
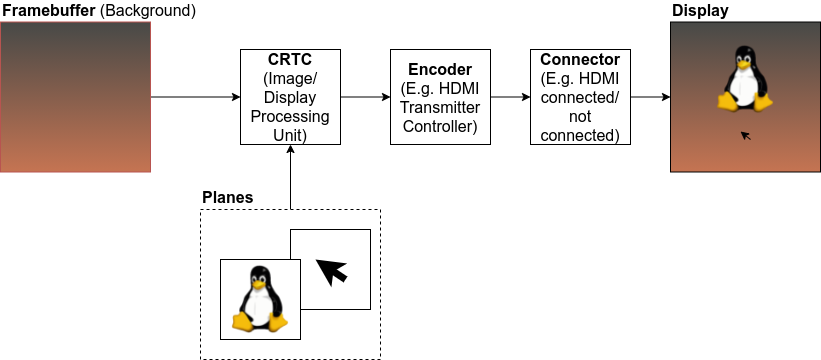
This image shows three different stages which can be configured by DRM. The first stage CRTC (Cathode-ray tube controller, the name comes from old cathode-ray tube displays) takes memory as input and creates an image based on the framebuffer and planes. Planes can overlay others (e.g. primary, cursor, video, etc.) and the output of the CRTC stage will result in a modified memory buffer that contains the image which should be displayed. Not all DRM drivers support multiple planes. The minimum required plane is one, which is the primary plane. The primary plane represents the dumb framebuffer in this example.
The second stage, the encoder, will convert the data in the memory to an actual signal for the display. For example, one encoder generates DVI signals for a computer monitor while another generates LVDS signals for an LVDS display.
Finally, there is the Connector which can signalize if a display is connected and what modes/resolutions it supports (e.g. via EDID). A connector can also be a virtual connector if the signal goes to a simple display without signalization (e.g. an LVDS or parallel RGB panel).
For more information about DRM check the talk about DRM from Maxime Ripard who works at Bootlin.
In this example, an Apalis iMX6 from Toradex is used. However, we can also test the application on a normal PC. We just need to make sure that no window manager is active (e.g. by switching to a virtual console).
drm-framebuffer
The goal of this article is to show a way on how we can write a simple application, which allows us to test a display in a similar way as when we had the old framebuffer device interface. The replacement for the dd command above would be:
Apalis iMX6 $ dd if=/dev/urandom | drm-framebuffer -d <dri device> -c <connector>In this section, we will discuss the steps to create a framebuffer and to set pixels on the screen. The whole application is available on Github.
Get a Framebuffer
To get a framebuffer we first need to get access to the Direct Rendering Manager. For this, a DRM driver will provide a Direct Rendering Interface which is located under /dev/dri/cardX. Through that device, we gain access to the Display Controller. A display controller can be part of a GPU or just a 2D Graphics Controller (e.g. for iMX6ULL or iMX7).
/* Open the dri device /dev/dri/cardX */
fd = open(dri_device, O_RDWR);
if (fd < 0) {
    printf("Could not open dri device %s\n", dri_device);
    return -EINVAL;
}
Now that we have access to the Direct Rendering Manager we want to access the connector by name. For that we first need to know the resources that the Graphics Controller has:
/* Get the resources of the DRM device (connectors, encoders, etc.)*/
res = drmModeGetResources(fd);
if (!res) {
    printf("Could not get drm resources\n");
    return -EINVAL;
}
We can now check every connector on this card if it matches the one we want to use:
/* Search the connector provided as argument */
drmModeConnectorPtr connector = 0;
for (int i = 0; i < res->count_connectors; i++) {
    char name[32];

    connector = drmModeGetConnectorCurrent(fd, res->connectors[i]);
    if (!connector)
        continue;

    snprintf(name, sizeof(name), "%s-%u", connector_type_name(connector->connector_type),
            connector->connector_type_id);

    if (strncmp(name, connector_name, sizeof(name)) == 0)
            break;

    drmModeFreeConnector(connector);
}
The connector will also tell us what the preferred resolution for this display is:
/* Get the preferred resolution */
drmModeModeInfoPtr resolution = 0;
for (int i = 0; i < connector->count_modes; i++) {
        resolution = &connector->modes[i];
        if (resolution->type & DRM_MODE_TYPE_PREFERRED)
         break;
}
We want to access the framebuffer from the CPU. For that most DRM drivers support the framebuffer type dumb buffer. This type of framebuffer can be accessed from the CPU side but not necessarily from the GPU side. However, we don't need 3D acceleration for this simple test application.
fb->dumb_framebuffer.height = resolution->vdisplay;
fb->dumb_framebuffer.width = resolution->hdisplay;
fb->dumb_framebuffer.bpp = 32;

err = ioctl(fd, DRM_IOCTL_MODE_CREATE_DUMB, &fb->dumb_framebuffer);
if (err) {
    printf("Could not create dumb framebuffer (err=%d)\n", err);
    goto cleanup;
}

err = drmModeAddFB(fd, resolution->hdisplay, resolution->vdisplay, 24, 32,
        fb->dumb_framebuffer.pitch, fb->dumb_framebuffer.handle, &fb->buffer_id);
if (err) {
    printf("Could not add framebuffer to drm (err=%d)\n", err);
    goto cleanup;
}
The dumb framebuffer has the same size as the display resolution and 32 bits-per-pixel but the color depth is only 24 bits. So the format is BGR(A), but the alpha channel is not used.
To show the framebuffer we need to add it to a CRTC. That's why we need to get the CRTC:
encoder = drmModeGetEncoder(fd, connector->encoder_id);
if (!encoder) {
    printf("Could not get encoder\n");
    err = -EINVAL;
    goto cleanup;
}

/* Get the crtc settings */
fb->crtc = drmModeGetCrtc(fd, encoder->crtc_id);
To draw something inside the dumb framebuffer, we need to gain access to the actual memory. We can do this by memory mapping the dumb framebuffer into a virtual memory region where we can access:
err = drmIoctl(fd, DRM_IOCTL_MODE_MAP_DUMB, &mreq);
if (err) {
    printf("Mode map dumb framebuffer failed (err=%d)\n", err);
    goto cleanup;
}

fb->data = mmap(0, fb->dumb_framebuffer.size, PROT_READ | PROT_WRITE, MAP_SHARED, fd, mreq.offset);
if (fb->data == MAP_FAILED) {
    err = errno;
    printf("Mode map failed (err=%d)\n", err);
    goto cleanup;
}
By accessing fb->data we can now control the framebuffer and draw in it by modifying the memory. However, we didn't set any data yet, that's why we don't add the framebuffer to the CRTC yet.
One last step we do is dropping the master capability on the file descriptor for now. By doing that we allow other applications to change the DRM pipelines. This is necessary if we want to start the application on another display. However, in most scenarios, there is only one application that controls the DRM pipeline. This would normally be the compositor of a windowing system (e.g. Weston, Kwin, Mutter, etc.).
/* Make sure we are not master anymore so that other processes can add new framebuffers as well */
drmDropMaster(fd);
Write to the framebuffer
After we setup the pipeline we finally need to fill the framebuffer with something. In this application we fill the display with data we read from stdin. This way we can pipe data to the framebuffer:
size_t total_read = 0;
while (total_read < fb->dumb_framebuffer.size)
    total_read += read(STDIN_FILENO, &fb->data[total_read], fb->dumb_framebuffer.size - total_read);
We write to the framebuffer by writing to fb->data which is the pointer to the virtual memory of the dumb framebuffer. After we are done with filling out buffer we can assign the framebuffer to the CRTC by calling drmModeSetCrtc. We first clear the display by assigning the CRTC framebuffer 0 and afterwards assign our dumb framebuffer.
/* Make sure we synchronize the display with the buffer. This also works if page flips are enabled */
drmSetMaster(fb->fd);
drmModeSetCrtc(fb->fd, fb->crtc->crtc_id, 0, 0, 0, NULL, 0, NULL);
drmModeSetCrtc(fb->fd, fb->crtc->crtc_id, fb->buffer_id, 0, 0, &fb->connector->connector_id, 1, fb->resolution);
drmDropMaster(fb->fd);
These are the main steps to display an image on a DRM-based Linux driver.
Usage
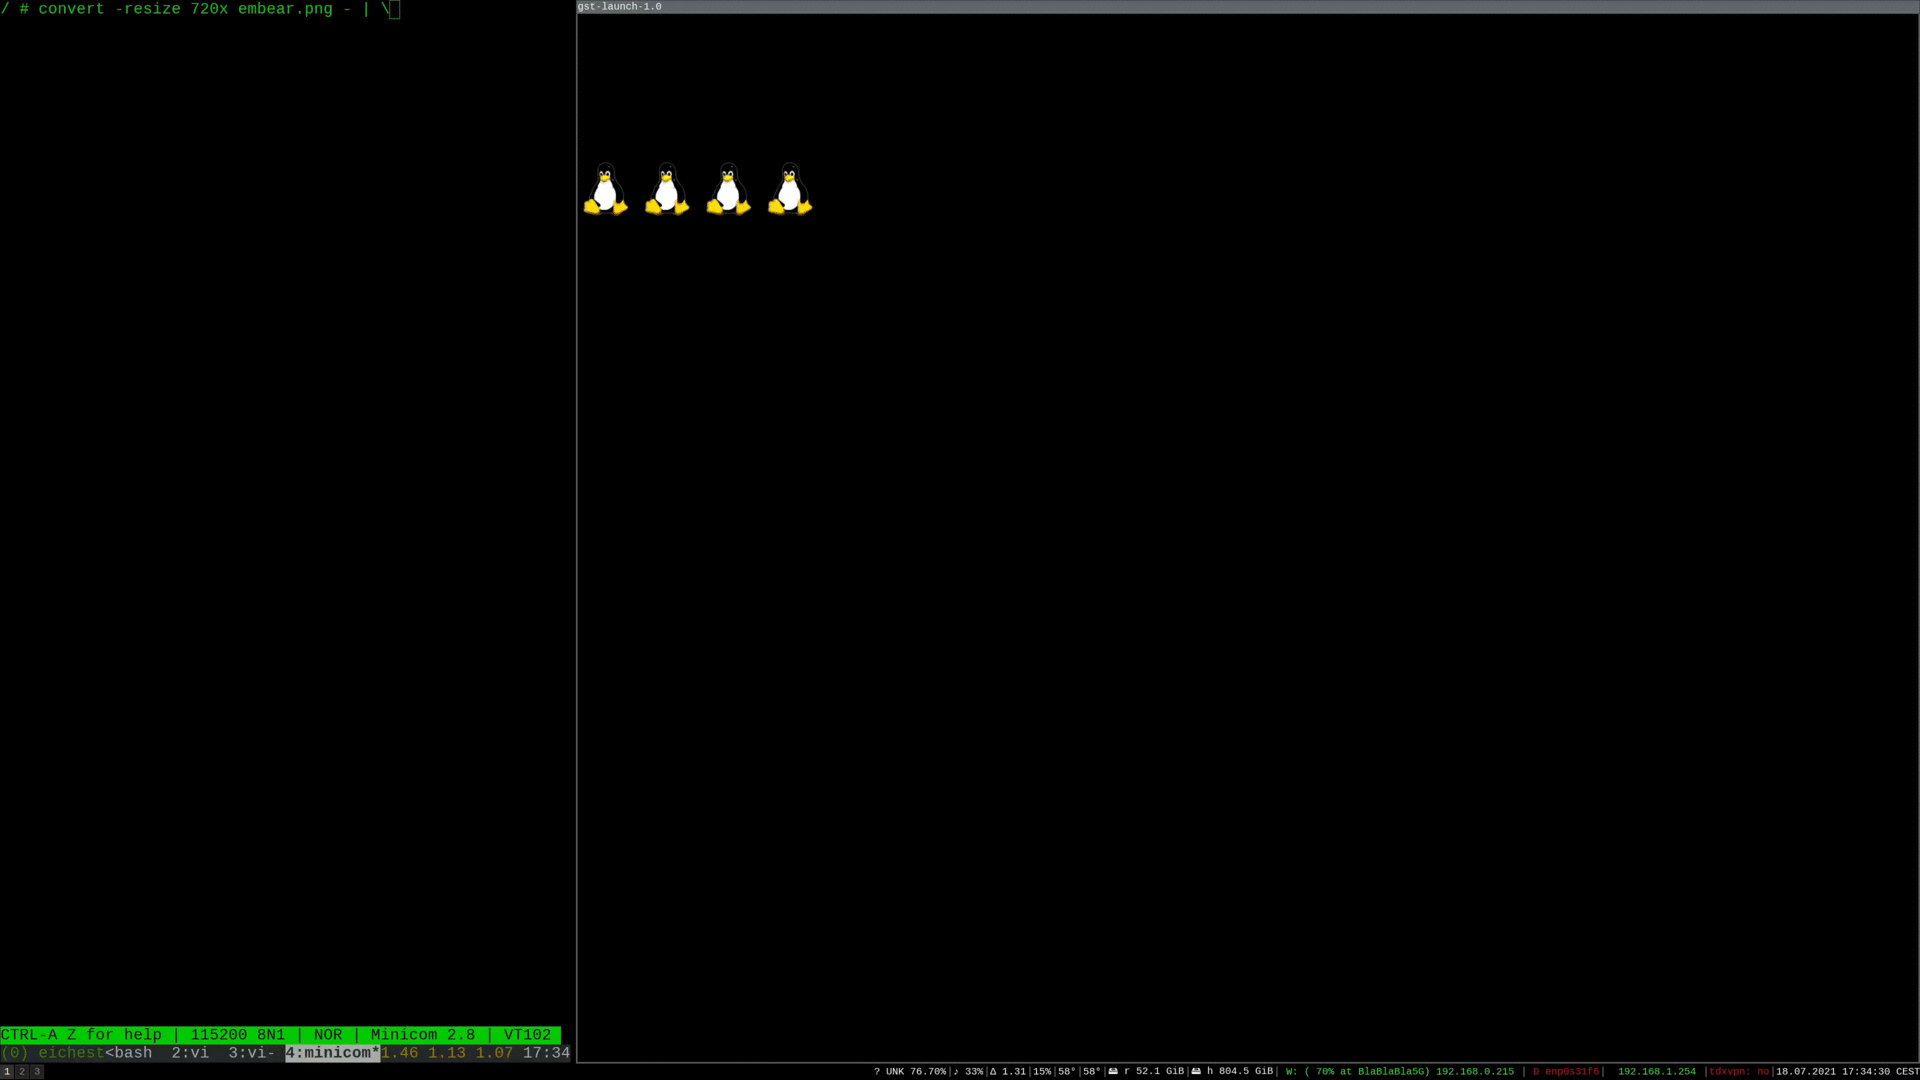
To use the drm-framebuffer application we first need to make sure that no compositor is blocking the DRM interface (master). This means we need to stop all window managers like X11, Weston, etc. If we run X11 it's also possible to just switch to a virtual console. We can normally do this by pressing CTRL+ALT+F2. With that, we switch to a virtual console and X11 drops the master capability. If we use an iMX6 we just need to make sure that no Weston or X11 is running. We can now read an image with imagemagick and convert it to a raw RGBA image. This image we then pipe into drm-framebuffer so that shows the image on the display. The following command will rescale the image to a width of 720 pixels and then put it in the center of a FullHD image. The final image will be output on the HDMI-A-1 Connector of the Apalis iMX6.
Apalis iMX6 $ convert -resize 720x embear.png - | convert -extent 1920x1080 -gravity Center - bgra:- | drm-framebuffer -d /dev/dri/card1 -c HDMI-A-1And here is a recording of how this looks on the actual device:
Where to use
With this simple application, we can directly draw on a framebuffer. This can be helpful during bring-ups when there is no framework available yet and we simply want to see if the display interface works. When developing an application we will normally not use DRM directly but use a framework like Qt or GTK instead. The framework will handle the memory allocation and set up the pipeline for us.